
Sprinkle Lion Bento Cake Tutorial
Some of the links in this post might be affiliate links. Some of the links in this post might be affiliate links. As an Amazon Associate I earn from qualifying purchases. This means I earn a small amount of money if you purchase something through the link, at no cost to you. I promise I only recommend items I love! You can read our full disclosure here.
what’s a bento cake?
It’s a small cake meant for just one person. You can make it for any occasion, or no occasion at all! They traditionally have very minimalist designs and are packaged in small takeout boxes.
What do I need to make this cake?
First off, this tutorial is for people who at least a little cake decorating experience! I won’t be going into detail on how to get smooth icing, cut even layers, etc. That’s for another day! If you know how to cut, fill and evenly frost a cake you should be good to go!
You’re going to need the following before you start:
1 4” Layer of Funfetti Cake (see notes below)*
About 1/4 batch of Swiss Meringue Buttercream*
A small 6” cake board or flat plate to make your cake on
Sugar Cookie Dough (storebought or homemade)
Lemon yellow, golden yellow, pink, & black gel food colouring (I like Americolor brand, but Wilton brand is good too and might be easier to find - I know you can find the Wilton brand at Michael’s & Bulk Barn)
Some cute sprinkles! (I like Sweetapolita Sprinkles - use my code MILKANDCOOKIESBAKESHOP for 15% off)
Toothpicks
1 14”-16” Piping bag (I like the re-useable ones but disposable works fine)
1 star piping tip (like a Wilton 1M)
2 8”-10” piping bags
2 small round piping tips (like a Wilton #3 or Wilton #4) and two larger round piping tips (like a Wilton #10 or #12)
Standard size couplers for your piping bags/tips
*My funfetti cake recipe makes 2 6” layers, or 4 4” layers. You can cut the recipe in half to get only 2 4” layers, but I wouldn’t reduce the recipe any more than that or it will be almost impossible to achieve a fluffy cake! I suggest making the full recipe and just stashing the extra 3 layers in your freezer for the next time you want to make a tiny cake! The same goes for the swiss meringue buttercream - make a full batch and stash the rest in your freezer. Bring it up to room temperature then rewhip it when you want to use it again!
You can also make this cake bigger if you want a bigger cake! You will just need more buttercream than is called for below, and you might need to make your ears and eyes bigger depending how big of a cake you are making. A full batch of my Swiss meringue buttercream would be perfect for decorating a 6” cake.
Ok, let’s start!
STEP 1:
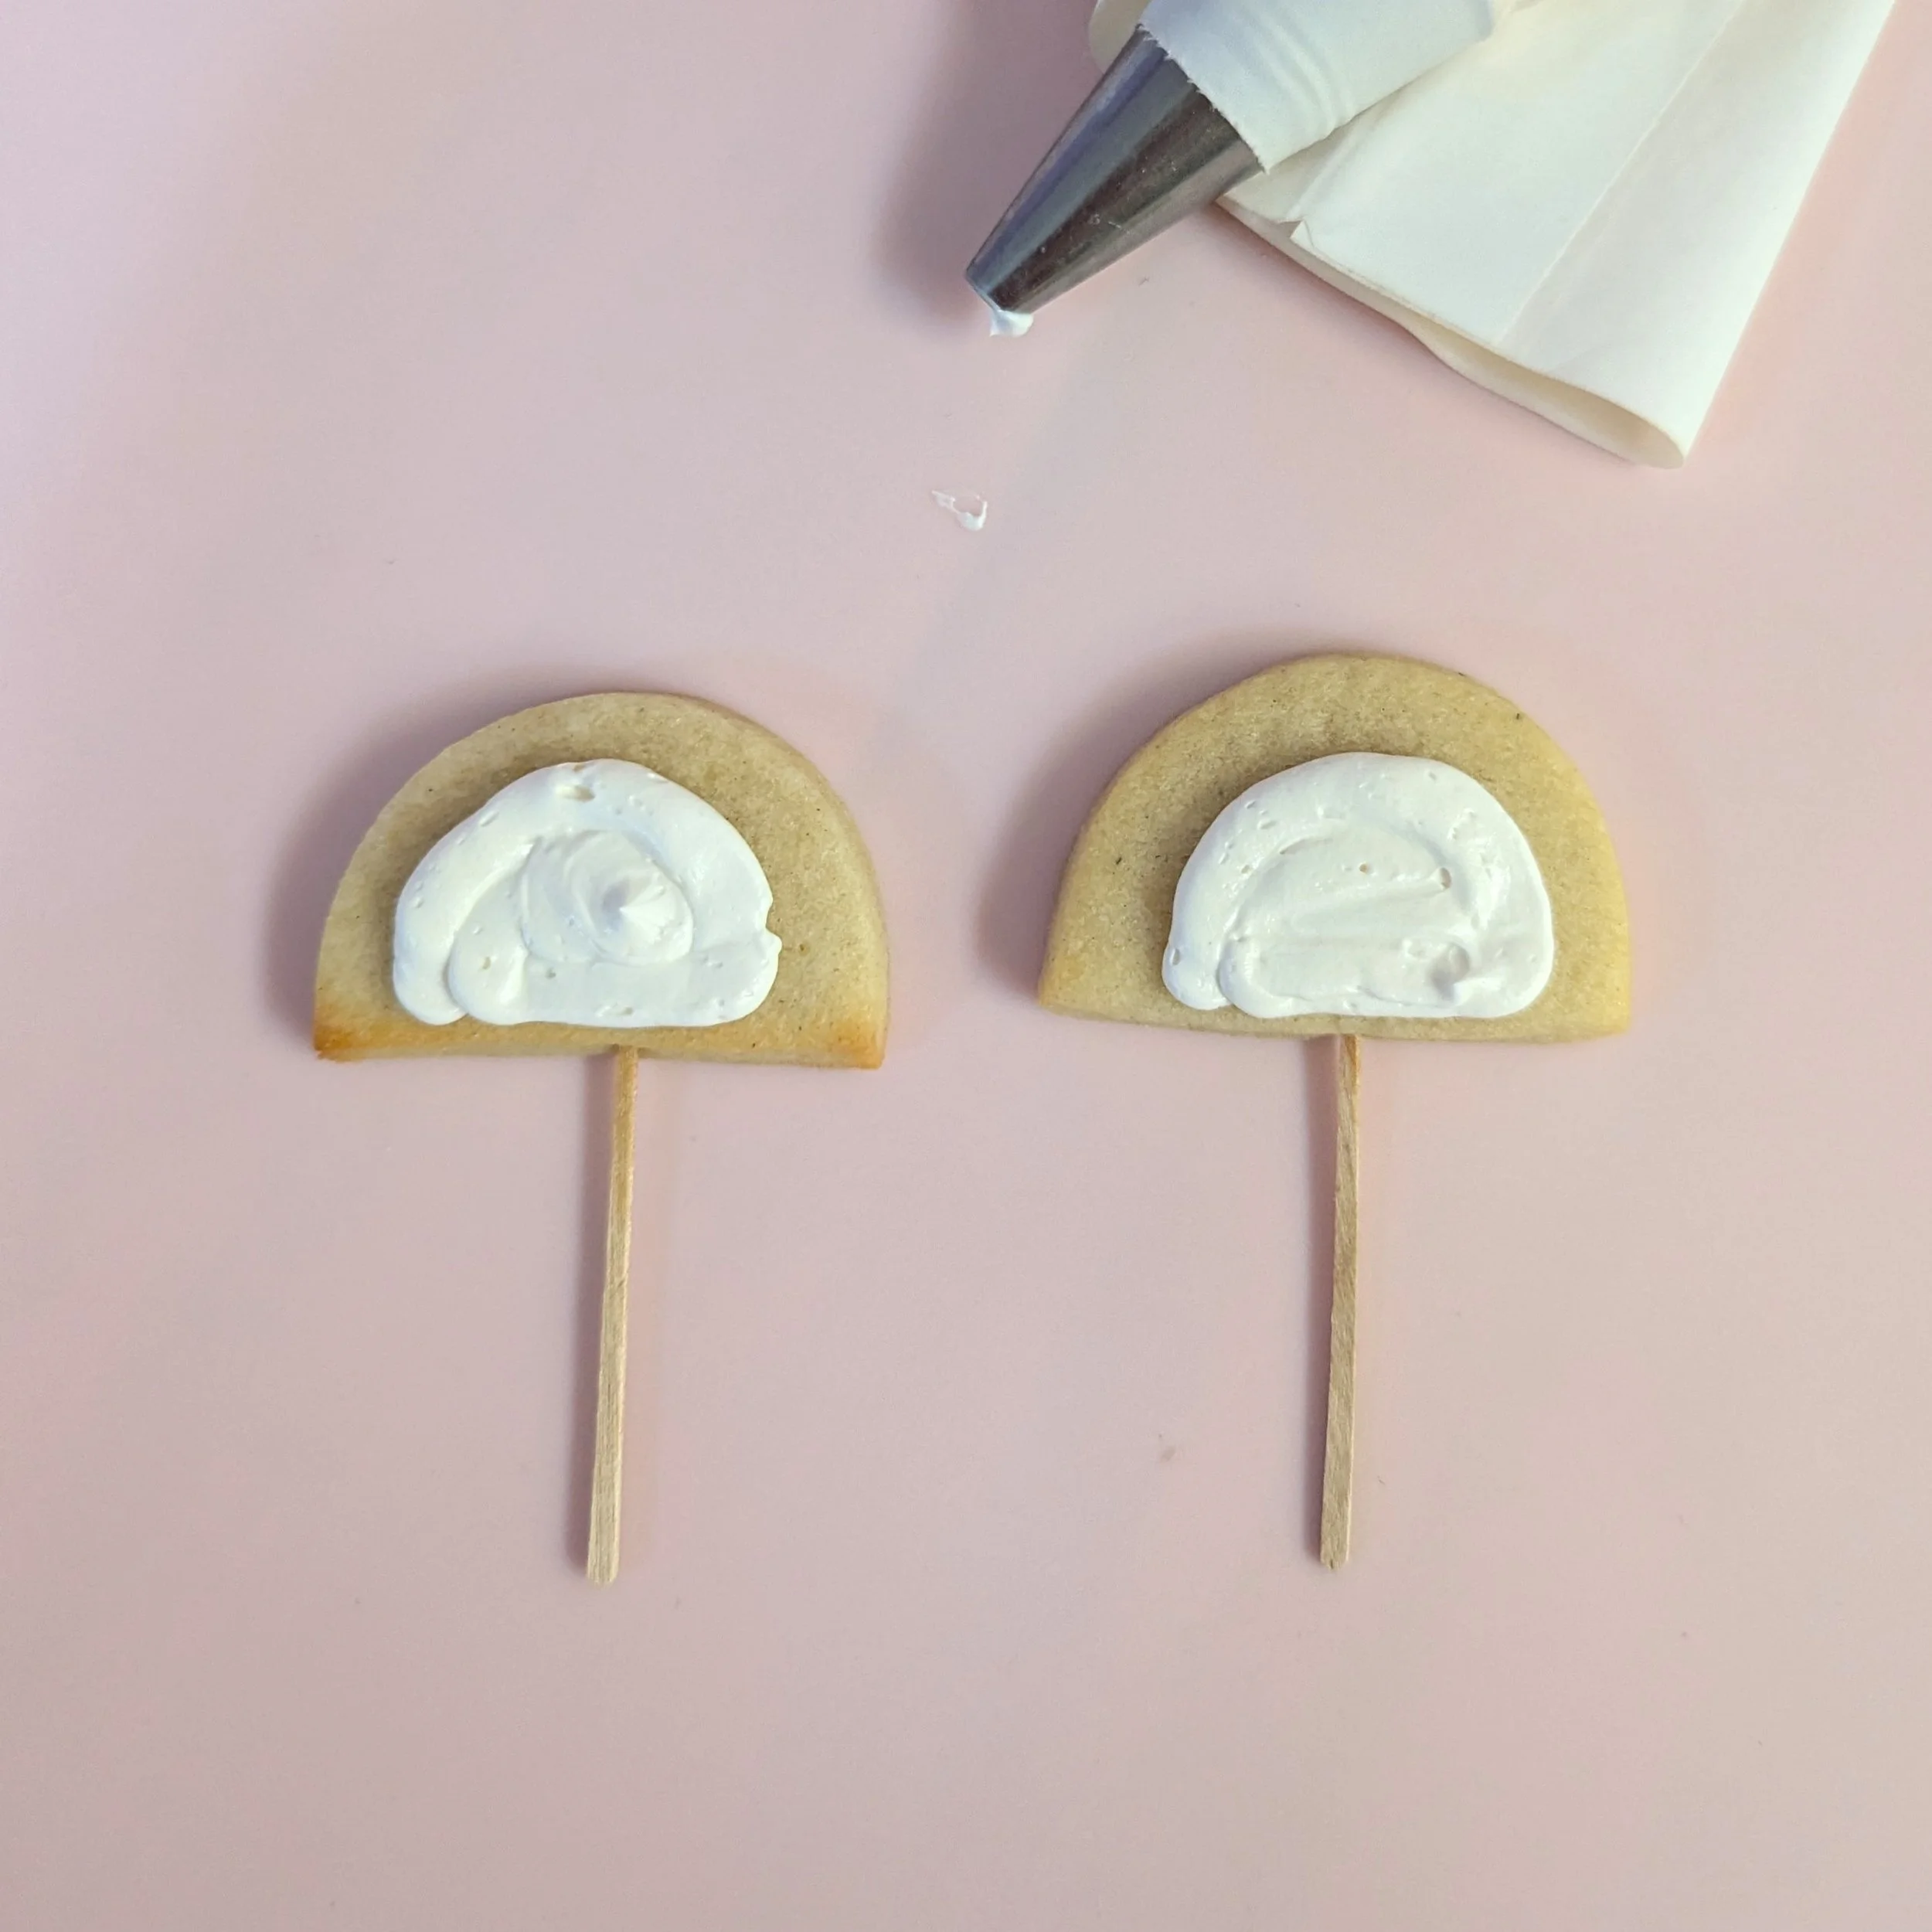
First, we’re going to bake the ears.
Take a small amount of sugar cookie dough and roll it out to about 1/4” thick on a lightly floured surface. Cut out 1 circle and cut that circle in half using a pizza cutter or a paring knife. Gently push a toothpick into the bottom of each half circle and place on a parchment lined baking try. Bake for 4-5 minutes at 375 F, until the edges just start to brown. Remove from the oven and let cool completely.
STEP 2:
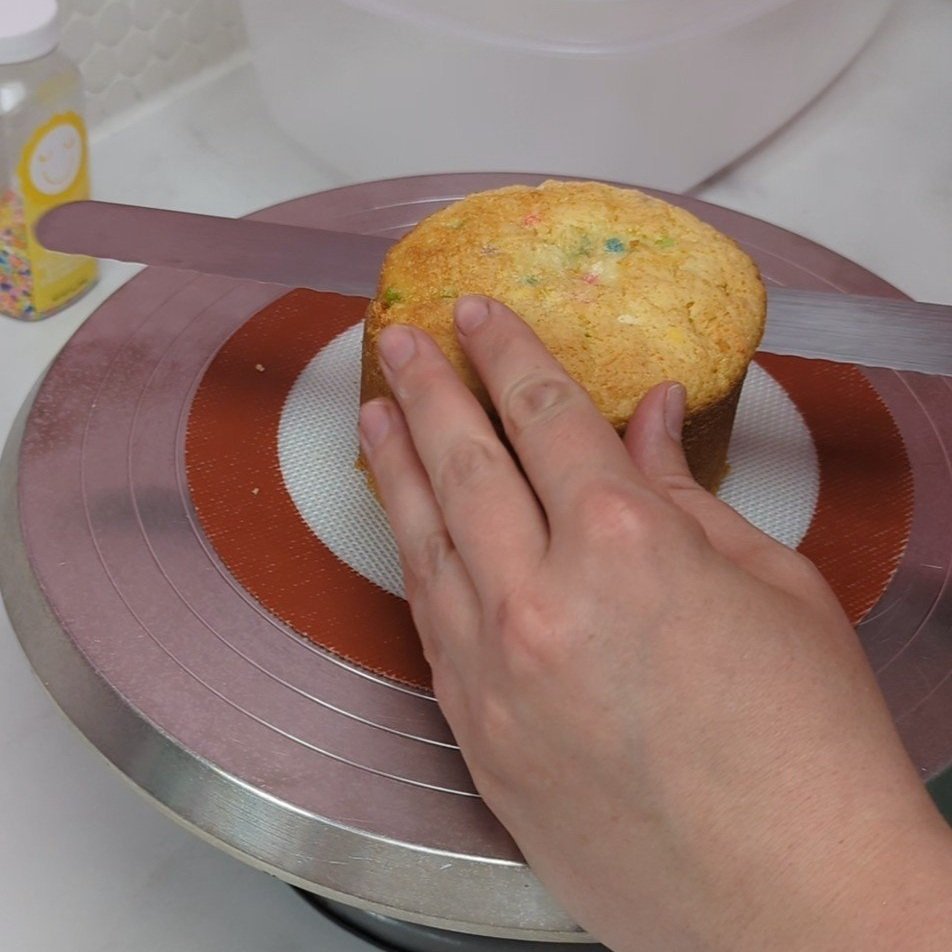
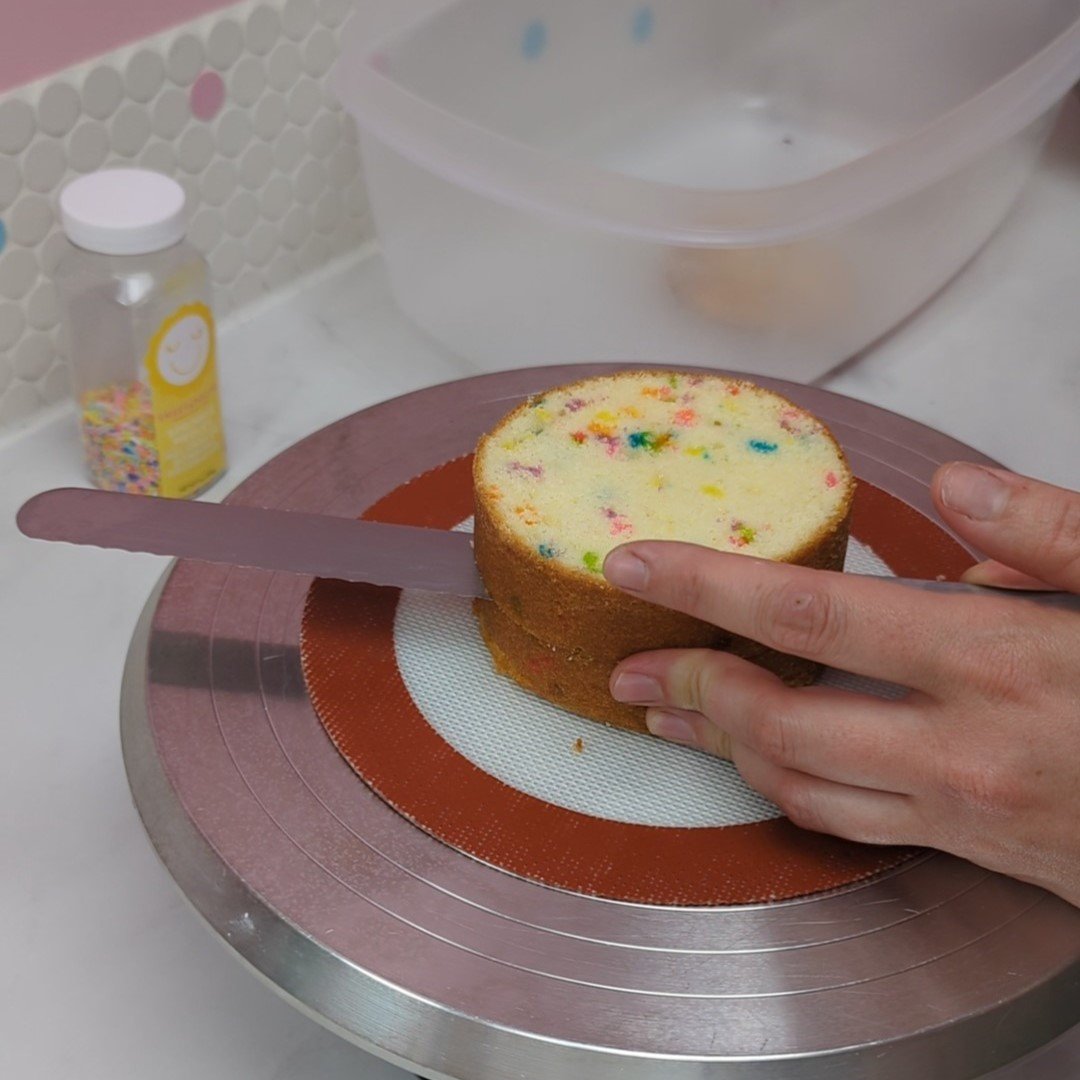
Put your cake on your turntable and trim the top of your cake with your bread knife to make it flat, then cut it into two layers.
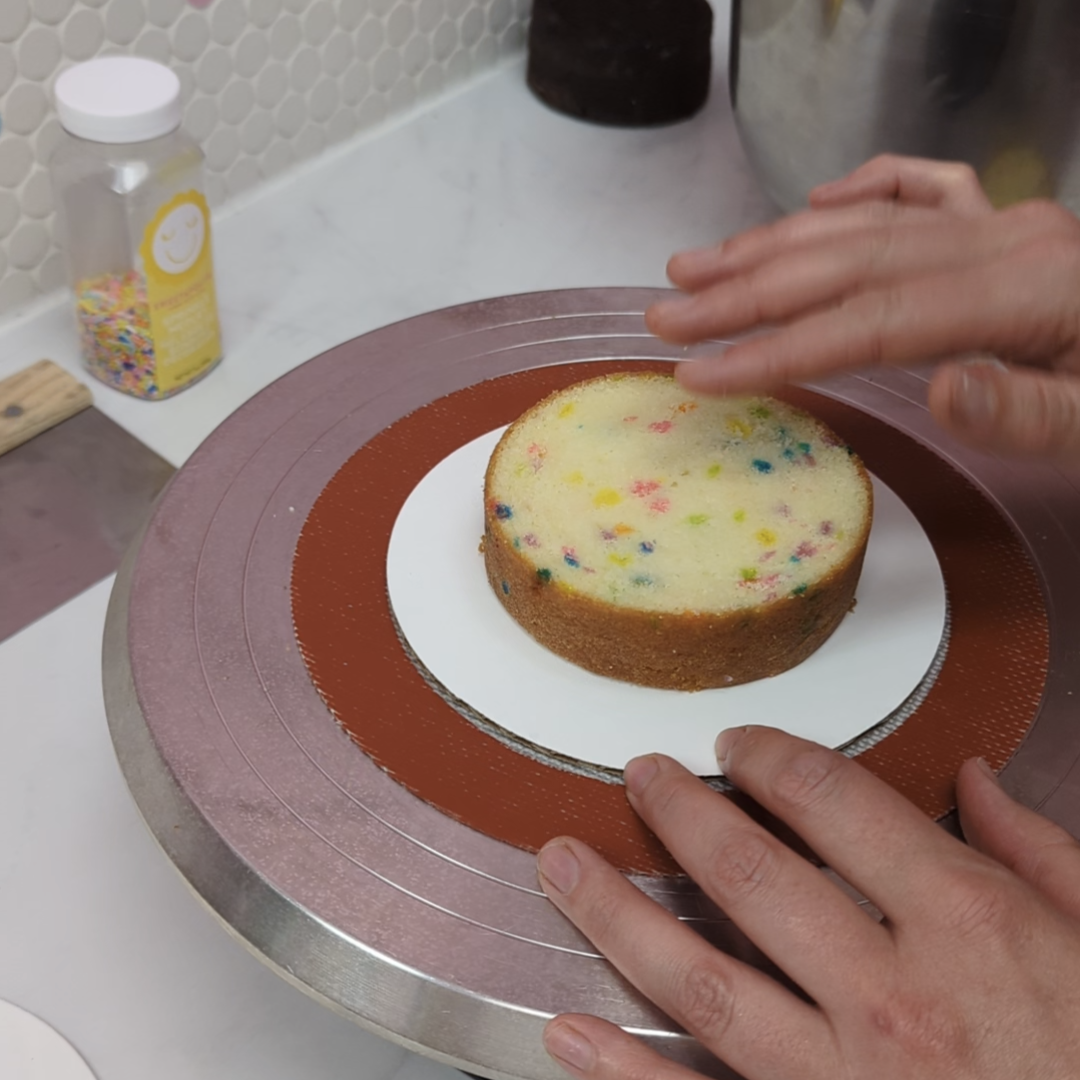
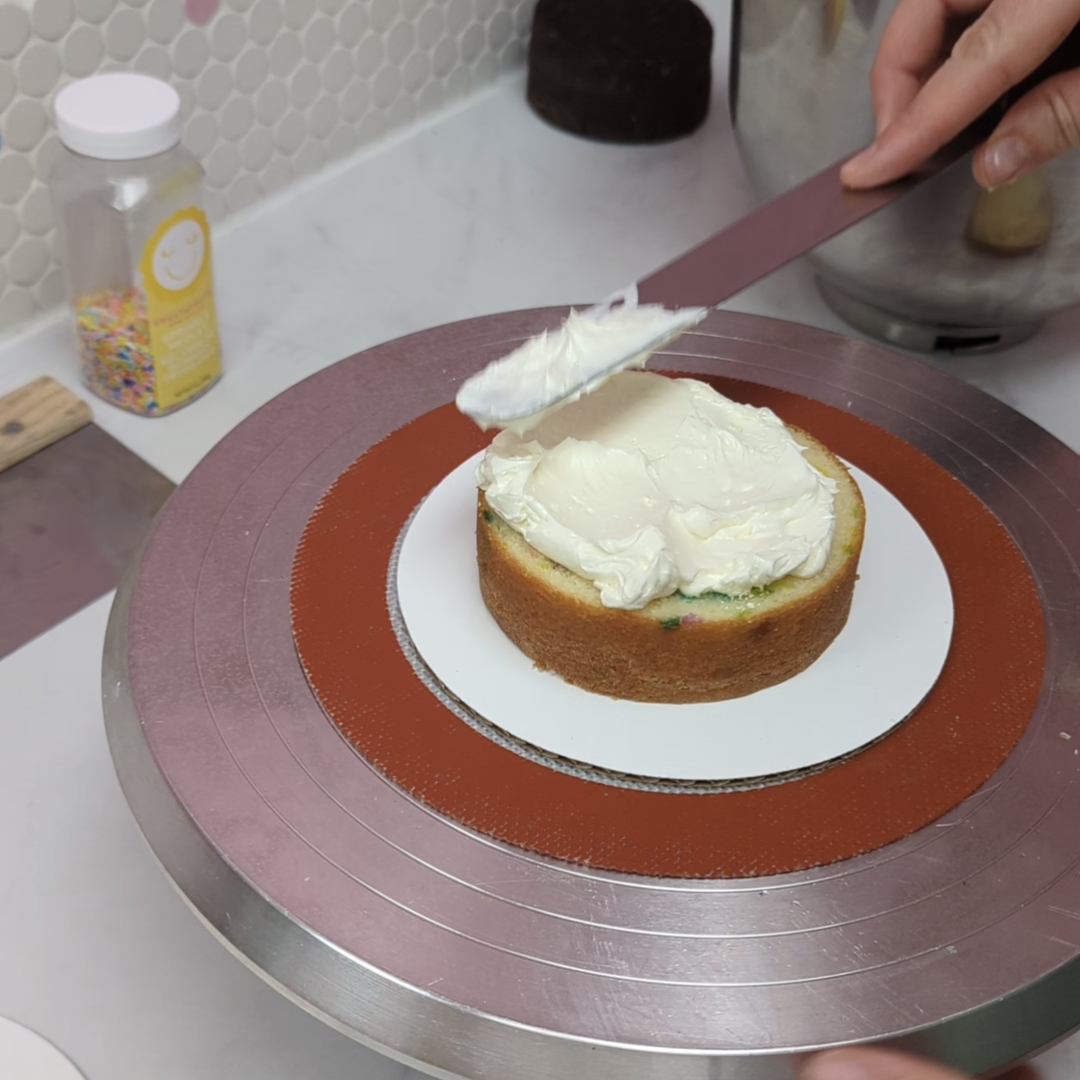
Secure the bottom layer of your cake to your cake board with a small dollop of buttercream.
Spread a small amount of buttercream on your bottom layer with your icing spatula .
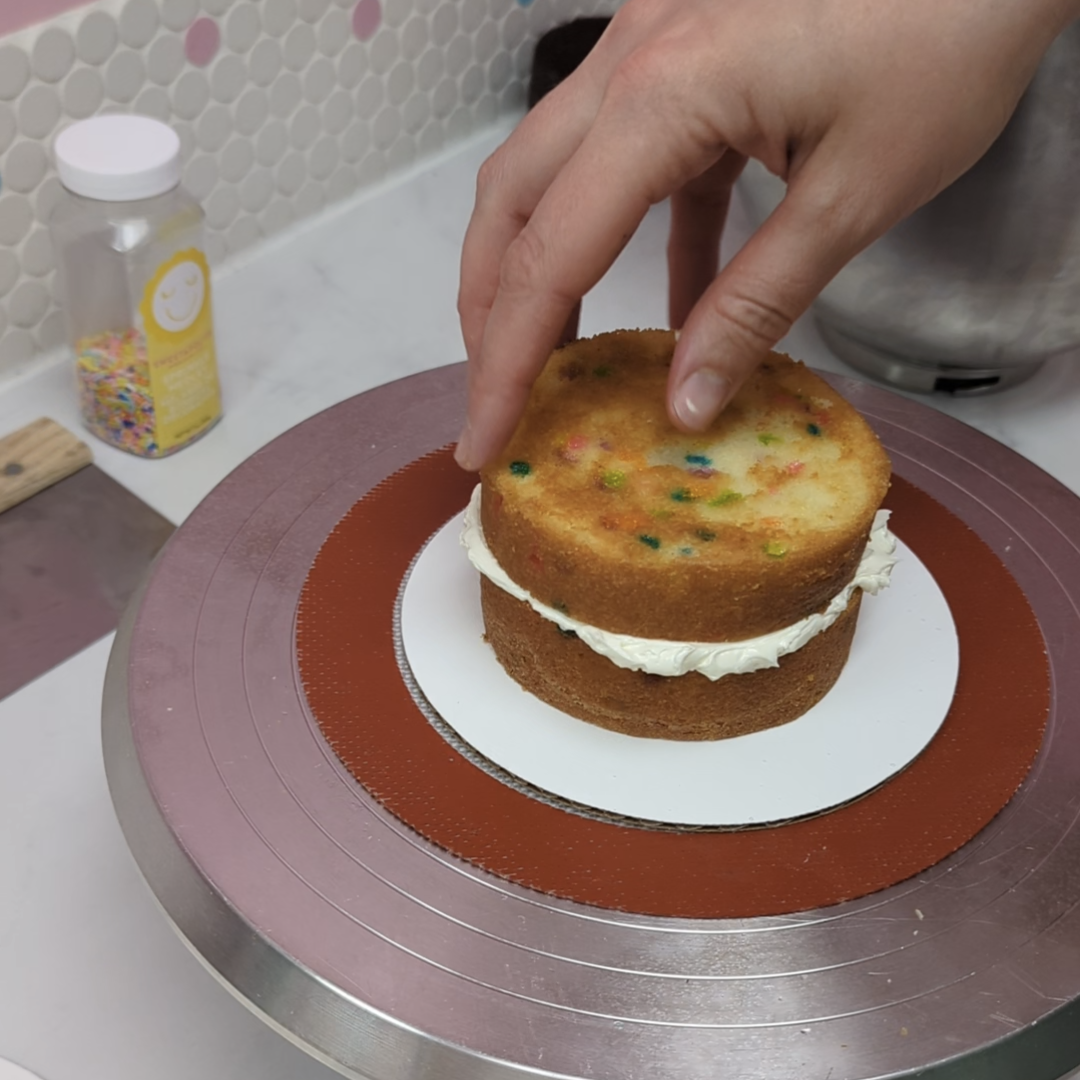
Place your top layer on top of the buttercream and push down gently to make it flat.
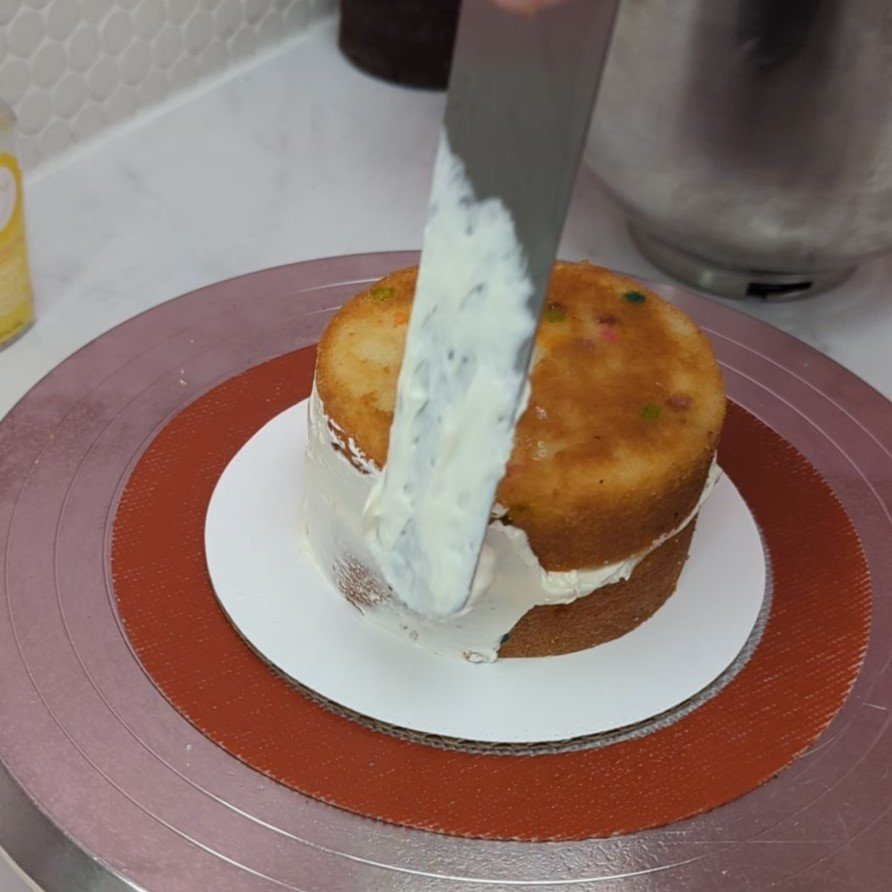
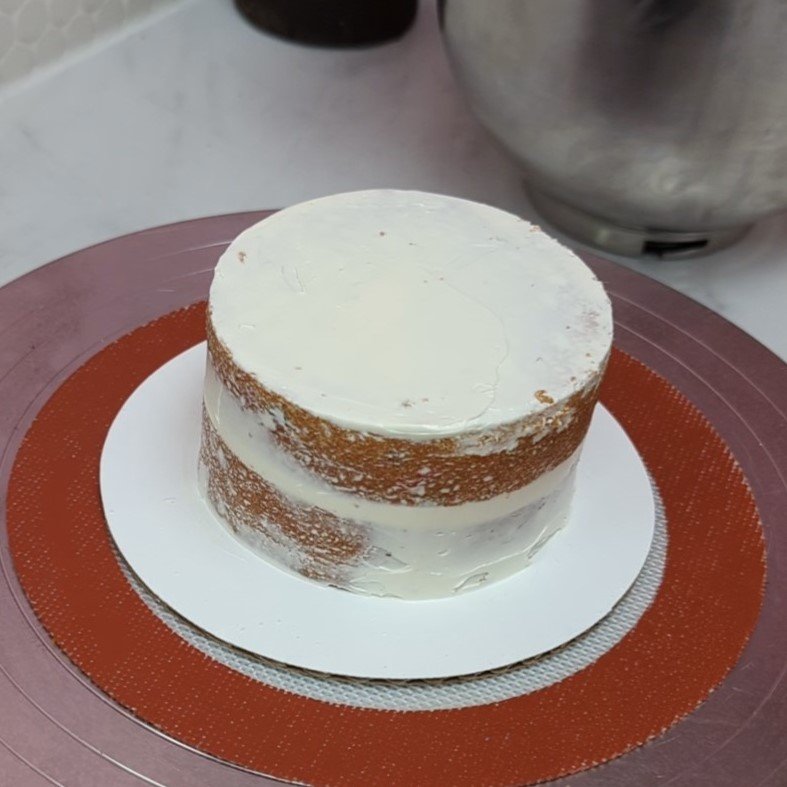
Next, do a crumb coat: Spread a thin layer of icing all the way around your cake, then use your scraper to scrape the icing smooth. Use the bit of crumby icing that you scraped off the sides to crumb coat the top of your cake, then smooth out the top edges with your spatula. Put the cake in the fridge to set for at least 20 minutes.
STEP 3
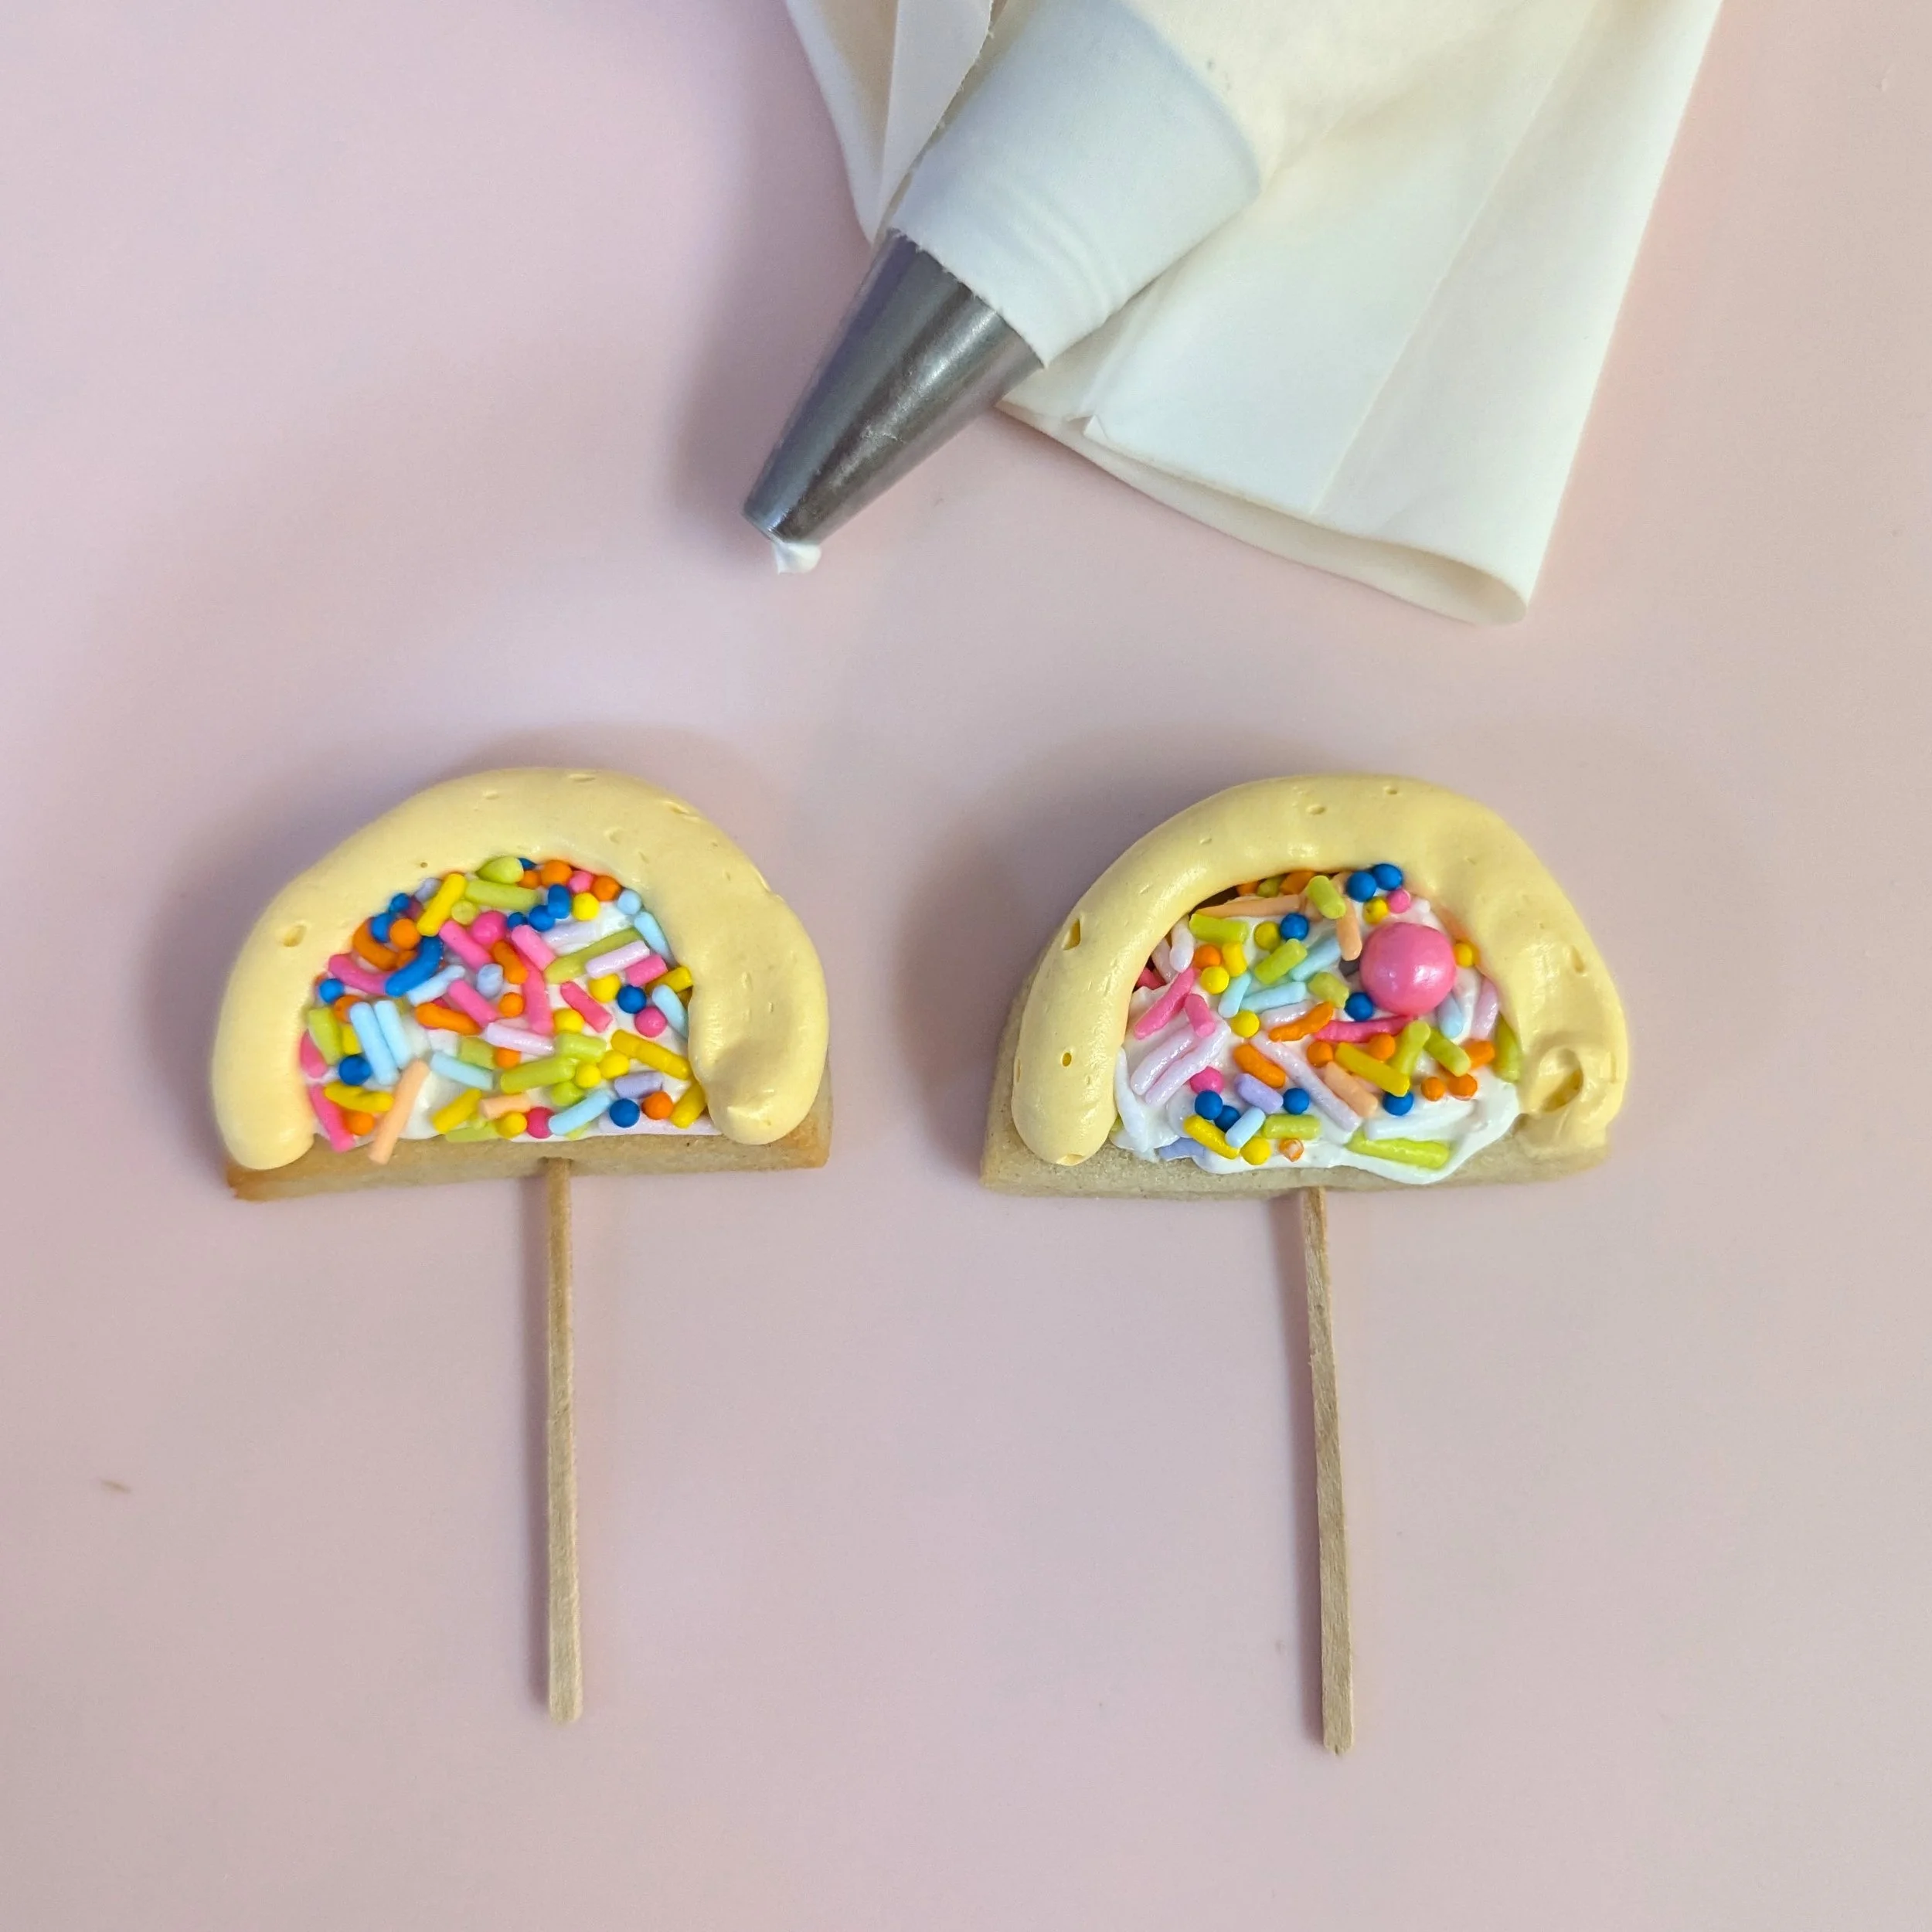
Decorate your ears! Pipe or spread white buttercream on the inside part of your ears, leaving room for yellow buttercream at the top. Pour your sprinkles in a small shallow bowl and sip the ears in the sprinkles and gently press the sprinkles in the make sure they are attached. Then, using a small 8” or 10” piping bag with a Wilton #10 tip & coupler or similar, pipe a half circle of yellow buttercream across the tops of your ears. Place the ears in the fridge to set.


STEP 4
While your cake and ears are in the fridge, mix your colored buttercream. You’ll need about 175g of golden yellow buttercream. I like to use a mix of lemon yellow and golden yellow Americolor gel colours to make mine.
You will also need a small amount of light pink buttercream and a small amount of black buttercream. I didn’t measure how much I used ot these, but just make a couple spoonfuls of each.
Once your crumb coat has set, pull your cake out of the fridge and put it back on your turntable. Use your icing spatula to frost your cake with a thick layer of the yellow buttercream. Scrape the sides with your icing scraper until you have smooth, even, straight sides, then use your icing spatula to smooth out the top.
Put your cake back in the fridge to set for another 20 minutes or so.


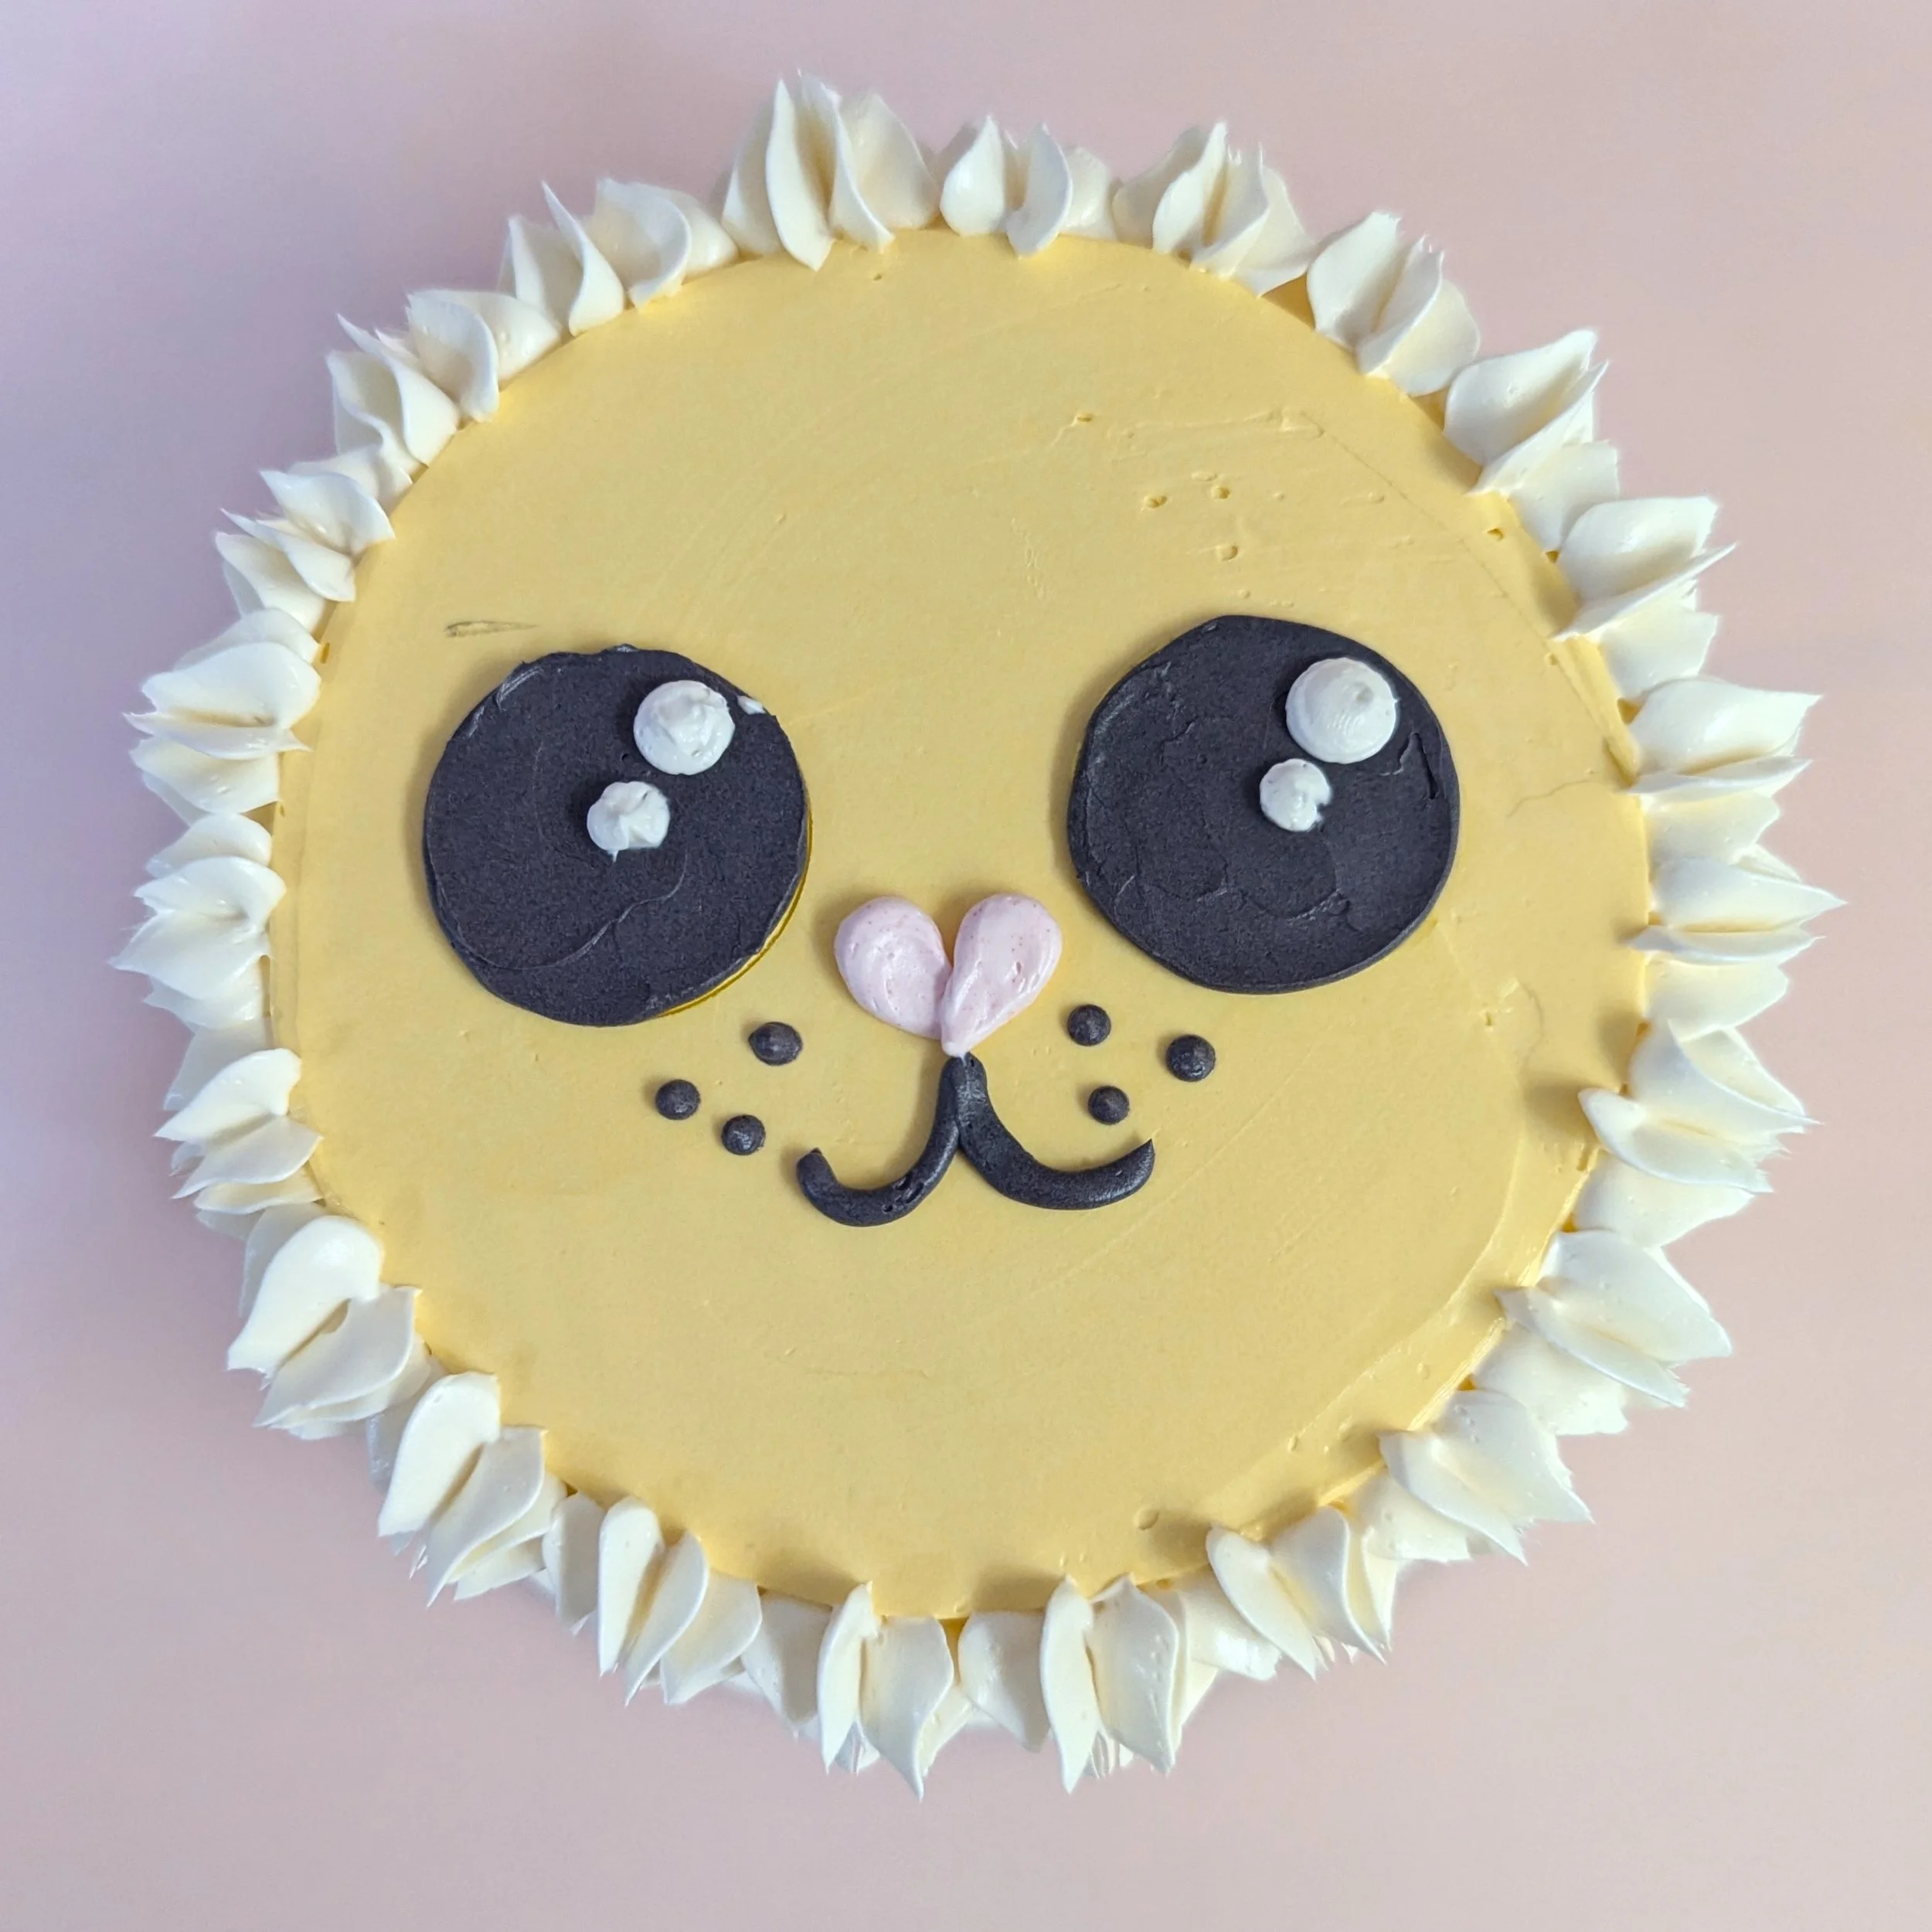
STEP 5
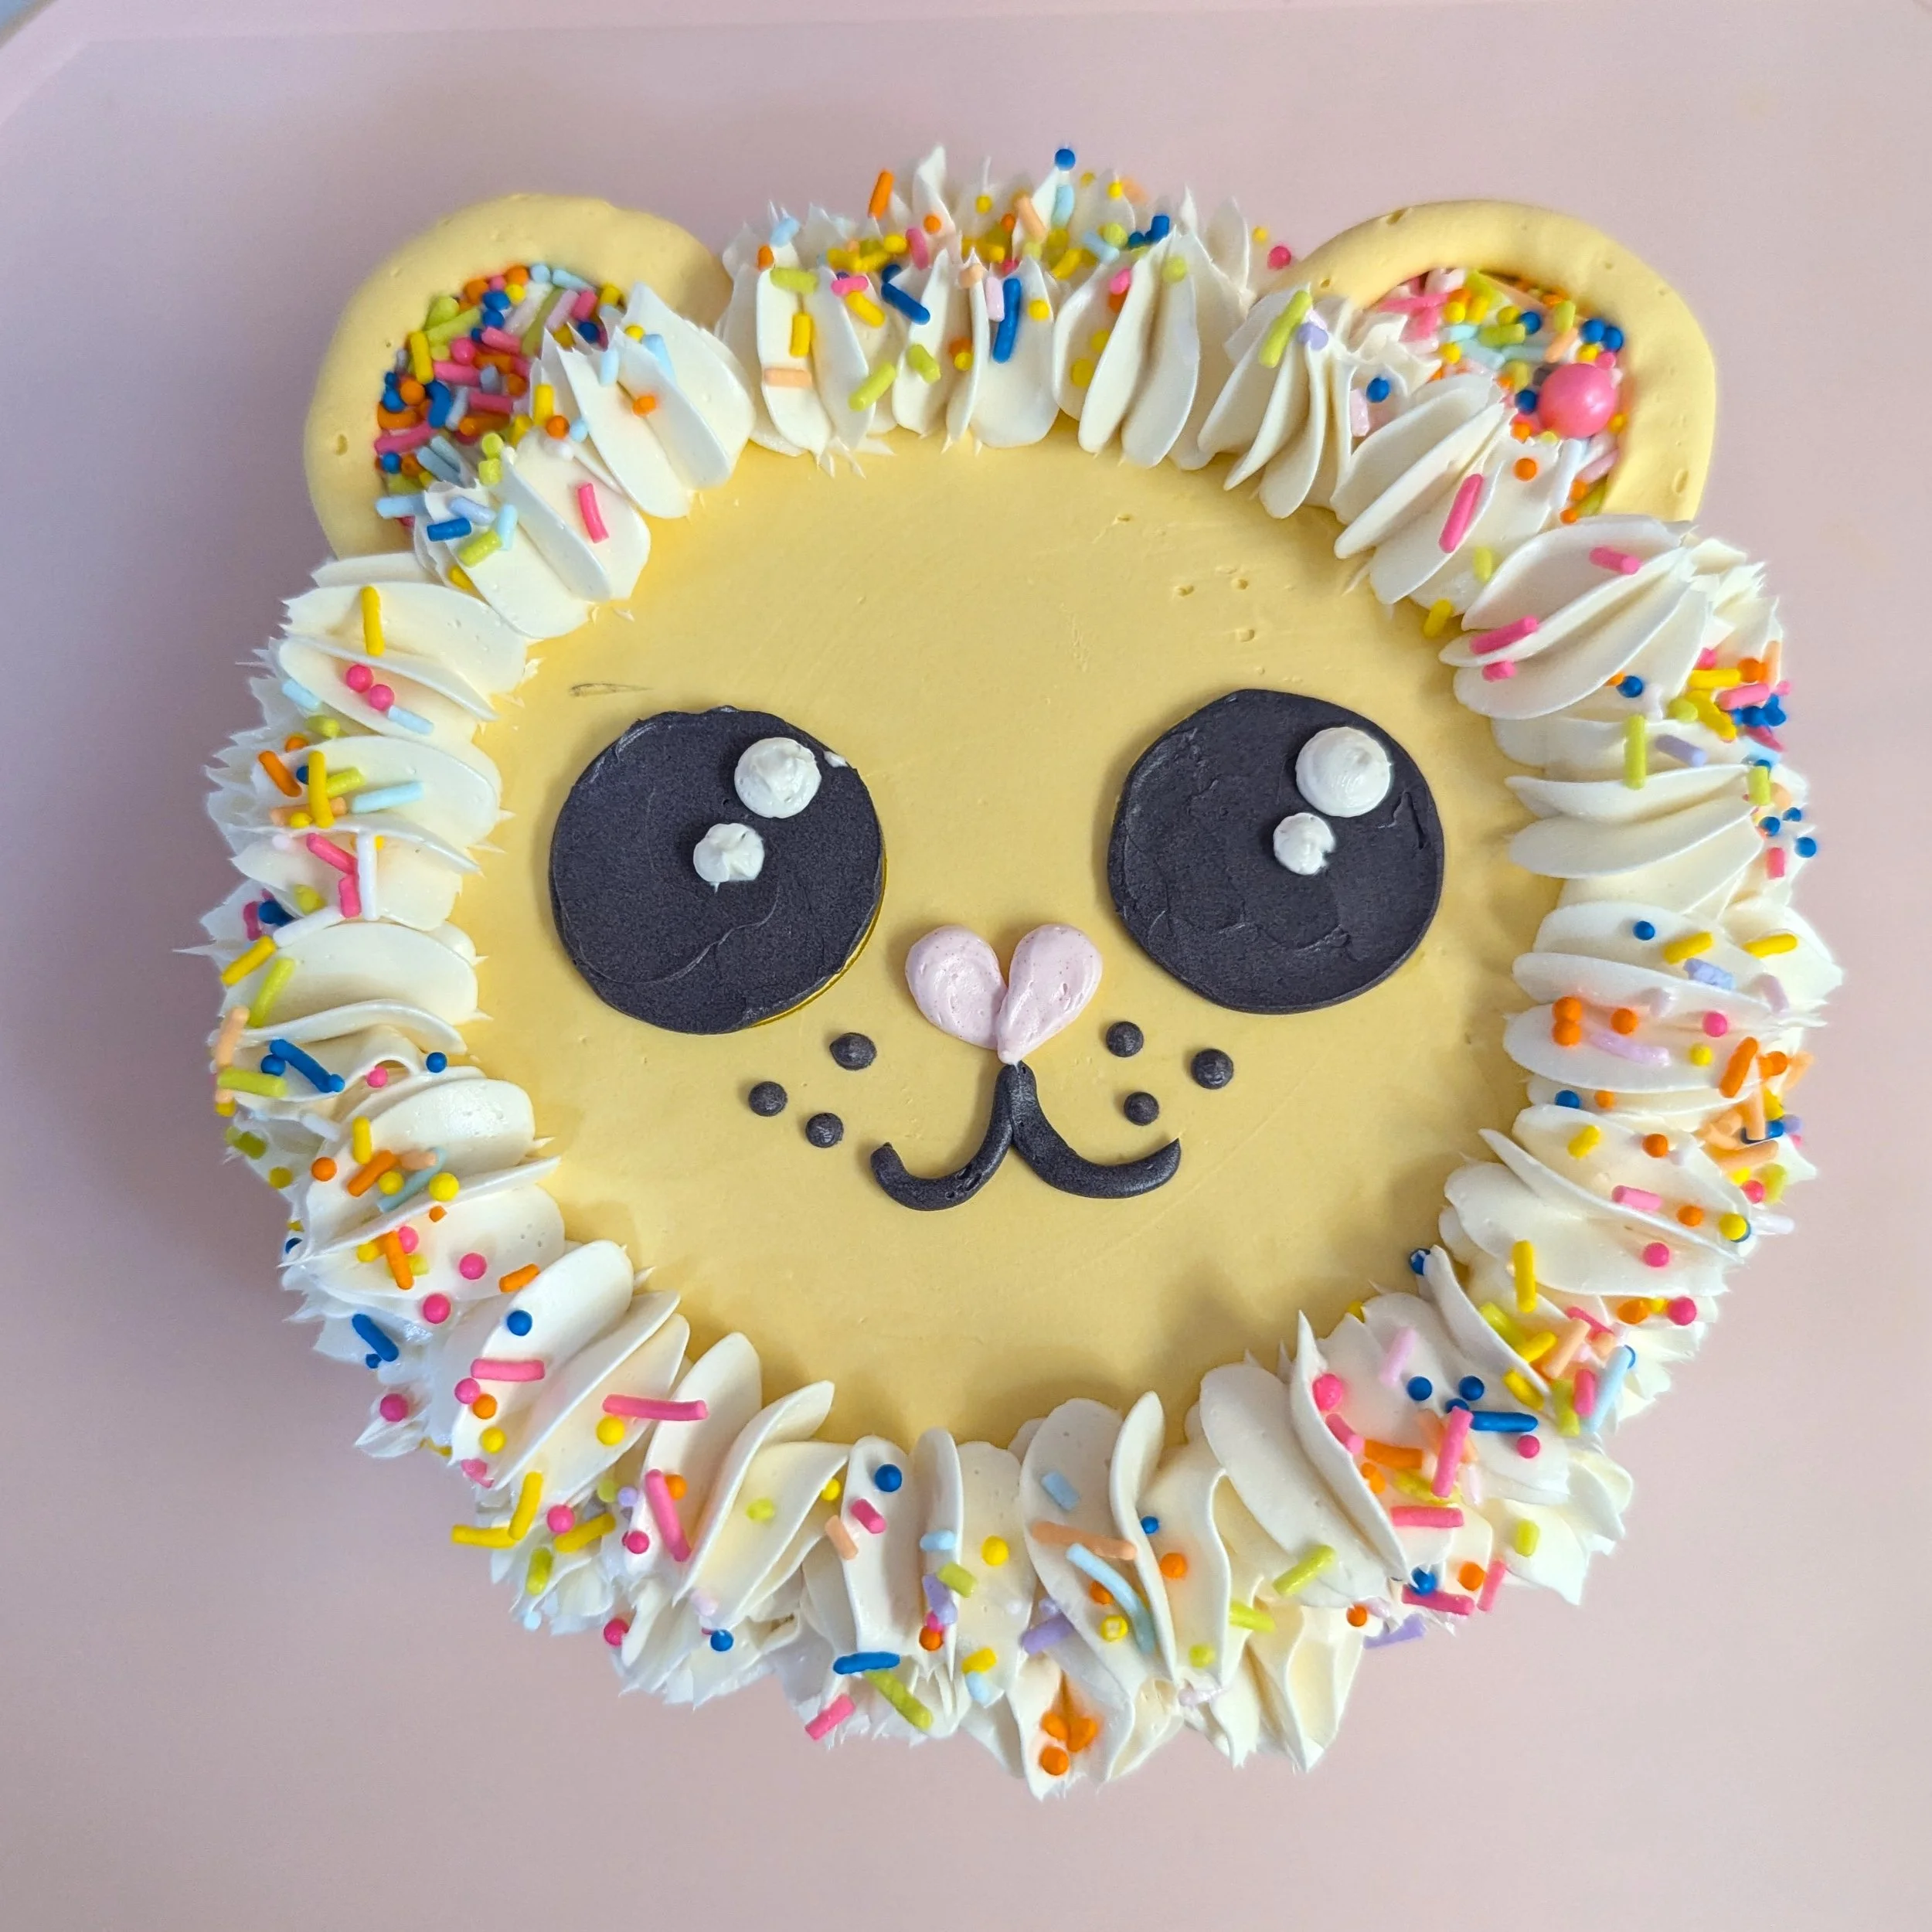
Once your cake is chilled, add the details. First, pipe a pink heart in the centre of your cake for the nose (#3 or #4 tip in an 8” or 10” piping bag) . Then, use a 1.5” circle cookie cutter to mark where you want the eyes and fill those in with black (#10 tip in an 8” or 10” piping bag). Use your spatula to smooth out the eyes, then add two white dots using white buttercream in an 8” or 10” piping bag with a #3 or #4 tip. You can smooth the white dots by gently tapping the tops of them with a wet fingertip if you want. Add a mouth and freckles using the black buttercream (switch your tip to a #3 or #4 for this!)


STEP 6
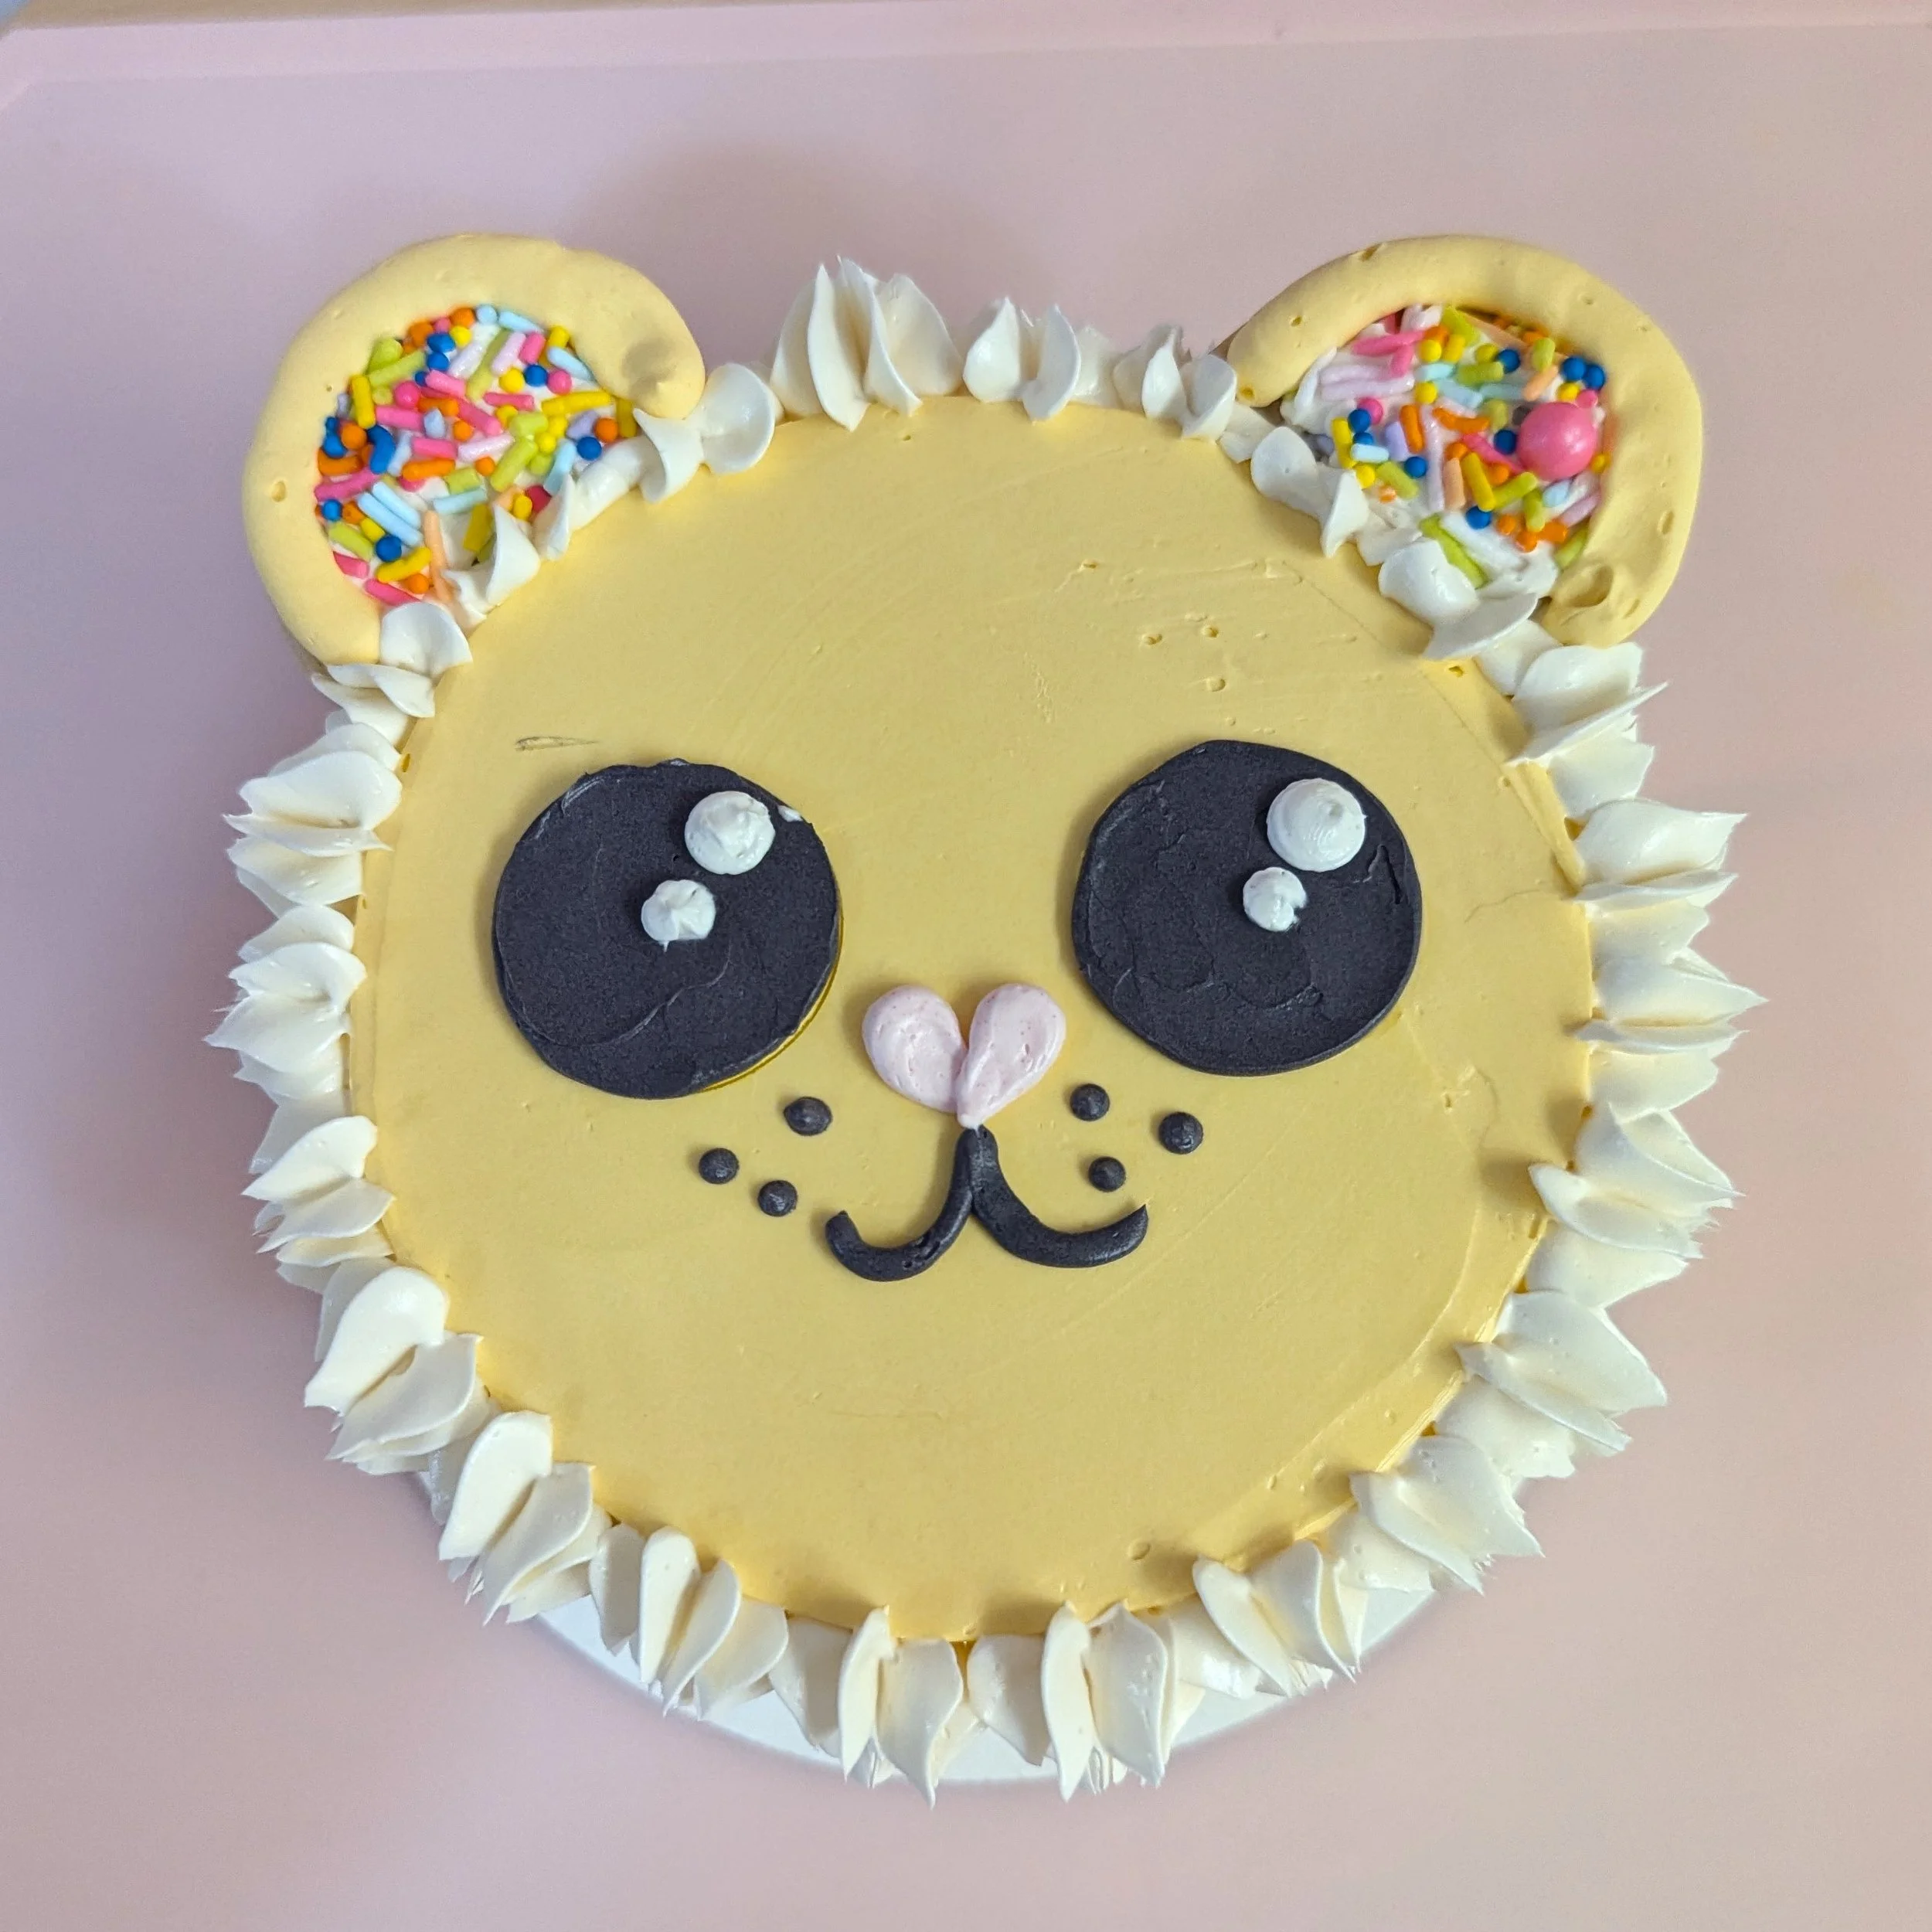
Using a star tip (like a Wilton 1M) in a 14” or 16” piping bag, pipe a ring of white buttercream around the outside edge of your cake, just below the top. Attach your ears by pushing the toothpicks into the sides of your cake just above where you piped your buttercream, then fill out the mane by piping another ring on top of the cake, right at the edge, then adding more wherever you want to get the look you want. Add sprinkles to your mane and you’re done!

Now take some pictures and show off your cutie creation to all your friends and family then grab a fork & dig in!